How to Set Up a Pass Template in Pass Creator
How to Generate a Pass Creator Template
Introduction
Pass Creator is a powerful tool that allows you to easily create customised pass templates for your guests. This guide will walk you through the steps of using the generator to create your own loyalty card template.
Prerequisites
You must have the correct permissions (granted via Platform Services) to access Pass Creator. To be able to save a template you also need to include relevant Apple and Google credentials and you will need active Apple/Google developer accounts in order to generate these. More information on that process can be found here.
Step-by-Step Instructions
Access the Generator Tool
Log in to Pass Creator using an active user-name and password. When logged in this user interface should look like this:
.png)
Access the Template Creator to build a new template
-
Click on the "Create Template" button
-
Choose the correct Company
-
Choose the correct Pass Type (currently only 'Loyalty' will be available to select)
-
The template creator is now ready to use
Customize Your Template
Once you access the template creator there are a number of fields available for you:
.png)
Name: This is the name you give your template. This name is used for internal reference only.
Logo Text: This should be the name of your company e.g. ‘Jordan’s Bar & Grill’
Header Text: This should be the name of the reward offering e.g. ‘Food rewards’.
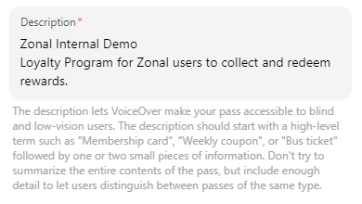
Description: The description lets Apple VoiceOver make passes accessible to visually impaired users. Begin the description with your program name on the first line, followed by your chosen description on the second line. Refer to the image below for guidance.
Logo Image: Upload image, for best results, use a square image with a transparent background, and at least the following dimensions: 100px by 100px. Maximum file size of 2MB.
Strip Image: Upload an image, for best results, use a rectangular, landscape image with at least the following dimensions: 750px by 246px. Maximum file size of 2MB.
Background Colour: Choose a background colour for your template. Background colour changes the entire display on the pass.
Text Colour: Choose a text colour from colour picker. Note: this is only applicable to Apple passes.
Label colour: Only applicable to Apple passes, label colour changes the display headers.
Optional Field 1: User can either pick customer name, program name or none. If customer name is chosen, the name of the customer appears on the end users’ interface, if program name is chosen, the name of the program as set up in loyalty is chosen.
Optional Field 2: User can either pick customer name, program name or none. If customer name is chosen, the name of the customer appears on the end users’ interface, if program name is chosen, the name of the program as set up in loyalty is chosen.
Apple certificate: Refer here on steps to generate certificate and password.
Google Key File: Refer here on steps to generate certificate and password.
Save
Accessing saved template
After creating and saving a template, you can proceed to ‘My Templates’ to access the already generated template and make changes as needed.
Note: If any changes are made to a Pass Template, guests who already have passes in their wallets will NOT see these changes.
Selecting desired template in Account Engine (Loyalty)
Customer proceeds to log in to Loyalty using user-name and password. For guidance on setting up email template in Loyalty click here.